Following the basics of printing, this will be a post about slicers. If you want to start 3D printing, one of the most crucial programs you will need is a slicer. The slicer determines how your printer will works to create your product. I’ll explain what a slicer does, which ones I use, and explain a few basic settings. I’ll also tell you where to find more info and community support to get your slicer printing just right.
What is a slicer?
A slicer is the name for the program that converts your 3D model (.STL format) into code that a 3D printer understands. It’s called a slicer because the 3D model is literally converted into slices of a certain thickness, these layers are then printed one at a time to create the product. Depending on which slicer you use, there are a lot of settings you can control, and I mean A LOT. Settings range from intuitive things like print speed to less obvious things like multiple extruders and materials. It can be very intimidating to start messing with these settings, but when you do it right it can mean the difference between a failed print or excellent product. The settings vary per printer so this won’t be a list of the right settings, such a thing does not exist unfortunately.
There are programs that integrate the slicer and 3D representation of your model into one neat user interface, one of these programs is Cura. Cura is the software created for the Ultimaker printers, and it is a nice and hassle free program to get started with. Aside from the Ultimaker printers, there are some other printers that Cura has default settings for.
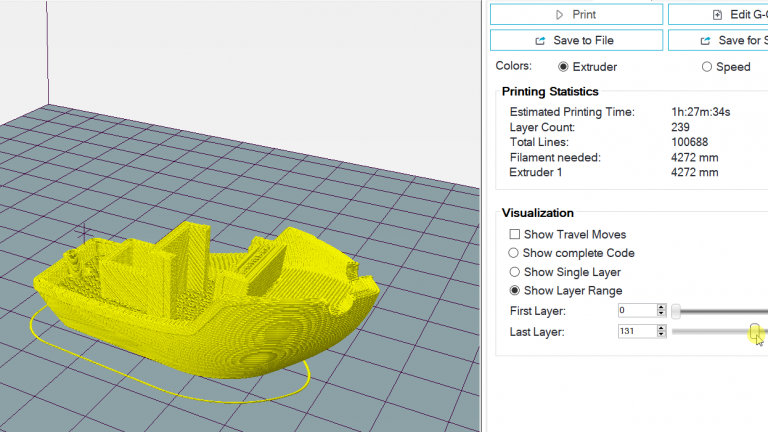
As far as selecting a slicer goes, most slicers have largely the same capabilities. You’ll want to start out with a slicer that you like, and when you run into a limitation, switch. My personal preference is Repetier, with Slic3r. Repetier is the user interface, and communicates with my printer. It has a choice of 3rd party slicers and I personally like being able to switch slicers for different prints. As you can see below, the slicer slices the Benchy printer test into actual layers. Benchy is a popular printer test created by CreativeTools and downloaded from Thingiverse.
Basic settings
I will list a few basic settings here, I recommend to not mess with any other settings unless you encounter problems with your print and know what you’re doing. If you’d like to see more in depth info on the more advanced settings, let me know in the comments. I will use the settings menu in Repetier with the CuraEngine because the layout is nice and clear. But don’t worry, these settings are present in all slicers.
Speed and quality
Speed and quality may seem very intuitive, speed goes down, quality goes up, right? Not really, quality in this sense means the layer resolution. Most printers can get away with a layer thickness down to 0.1mm. Be aware that a lower layer thickness means more passes, and more print time. Decreasing the layer thickness too far may cause problems with your printer such as clogs.
Speed
Print speed, in the case of most printers, means the XY motion speed. This is the speed at which your print head can maximally travel over your product. This is always a max speed, because speed varies during printing. There is a “slow” and “fast” column, because you can select a print speed when slicing with a slider. These values are the limits of the slider.
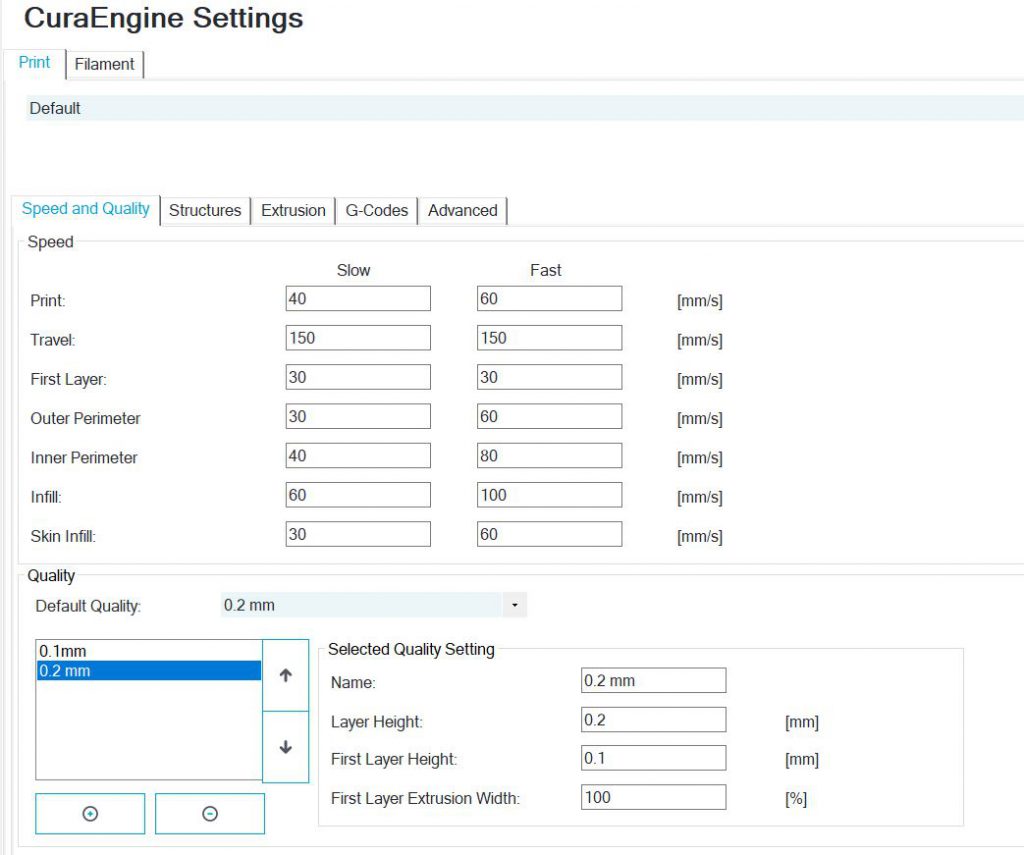
This sets the maximum XY movement speed while the printer is extruding. This limits the motion speed while material is coming out of the print head and your printer is building the model. This is the general speed of your print, with all the other speed below being tweaks to either speed up the process (infill speeds) or improve the surface finish (outer perimiter). When you are just starting out (and don’t have default settings for your printer), I recommend to keep anything but “travel” and “first layer” to the same values as “print”. Because of this, I will only explain “travel” and “first layer”.
Travel
This sets the maximum speed while the print head is moving from one place to another, when the printhead is not extruding. This speed can be much greater than the print speed, since there is no building taking place. This speed is often the maximum speed the printer can achieve.
First layer
The first layer in 3D printing is crucial, because this is the layer that sticks to the build surface. If this fails to stick completeley or partially, the print will fail or lift around corners. This speed is usually lower than the normal print speed.
Quality
Most slicers allow for different profiles, and in the picture you can see I use only 2. These settings control the thickness of the individual layers, and the first layer seperately. The first layer is the layer that determines how well the product sticks to the build surface. Because of this, it is usually squished down more than other layers. This can be done with a lower print speed, smaller layer thickness and different extrusion speed (volume). A good starting point is 0.2mm for layer height, 0.2mm for first layer height, and 100% for the extruder. If you encounter problems with first layer adhesion (and your build surface is clean and prepped), I suggest playing around with the first layer settings.
Structures
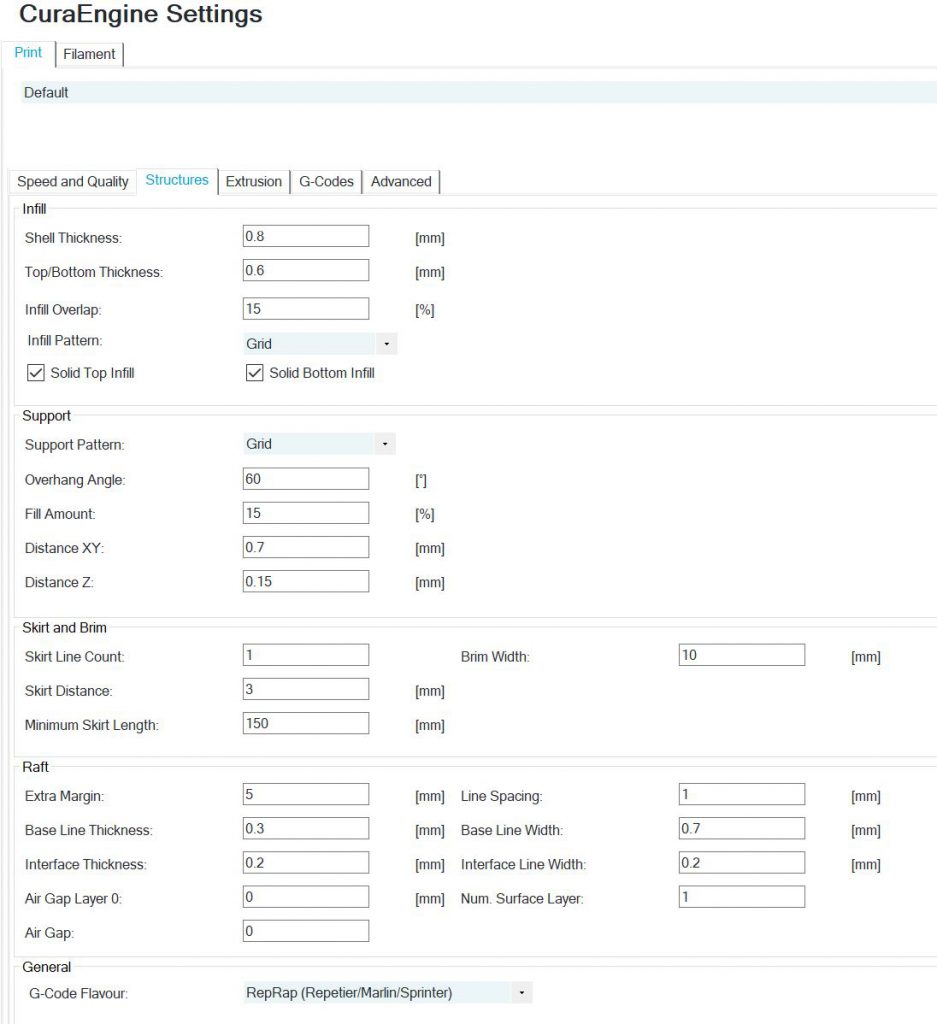
The structures tab has a lot of data, but I will only explain the few settings that you’ll actually want to change right away. There are 4 main fields: infill, support, skirt and brim, raft. Each of these controls a different aspect of your print.
 Infill
Every print consists of a wall and an infill. The wall is the part of the print thats solid and visible. The infill is the structure thats printed inside the walls. A hollow print would compress easily and break, the infill prevents this. The infill can have several shapes, in this example it is set to “grid” which means that the infill will be squares printed horizontally. I prefer using “gyroid” whenever possible, because this is an extremely strong 3D shape.
Support
Support is the structure that is optional to print, and is used to support overhangs in the print. If there is a part that would be printed in the air (think hanging branches on a tree), you’ll need support to create a surface in midair to print on. Support simply means that support structures are added, which you can break or cut away when the product is finished. The default settings are usually fine to start with, but if you are having trouble removing the support, change the pattern to “lines”.
Skirt and brim
The skirt or brim are structures used to improve adhesion on parts that have a very small bottom surface area (the bit that sticks to the bed). This creates a brim attached to the part to increase that surface area. I’ve never seen the need to use it, but there are situations in which it can’t be avoided. Default settings are fine to start with.
Raft
Similar to a brim/skirt, but instead of just creating more surface area, this actually raises the model off the build surface. Printing a raft for your print to sit on. Like the skirt/brim, I’ve never seen the need to use this. Default settings will work.
Extrusion
The extrusion tab is usually intimidating to new users. It has a lot of options, and not all of them are obvious from the name. By far the most important setting here is “nozzle diameter”. If this is off, you’ll never get a decent print.
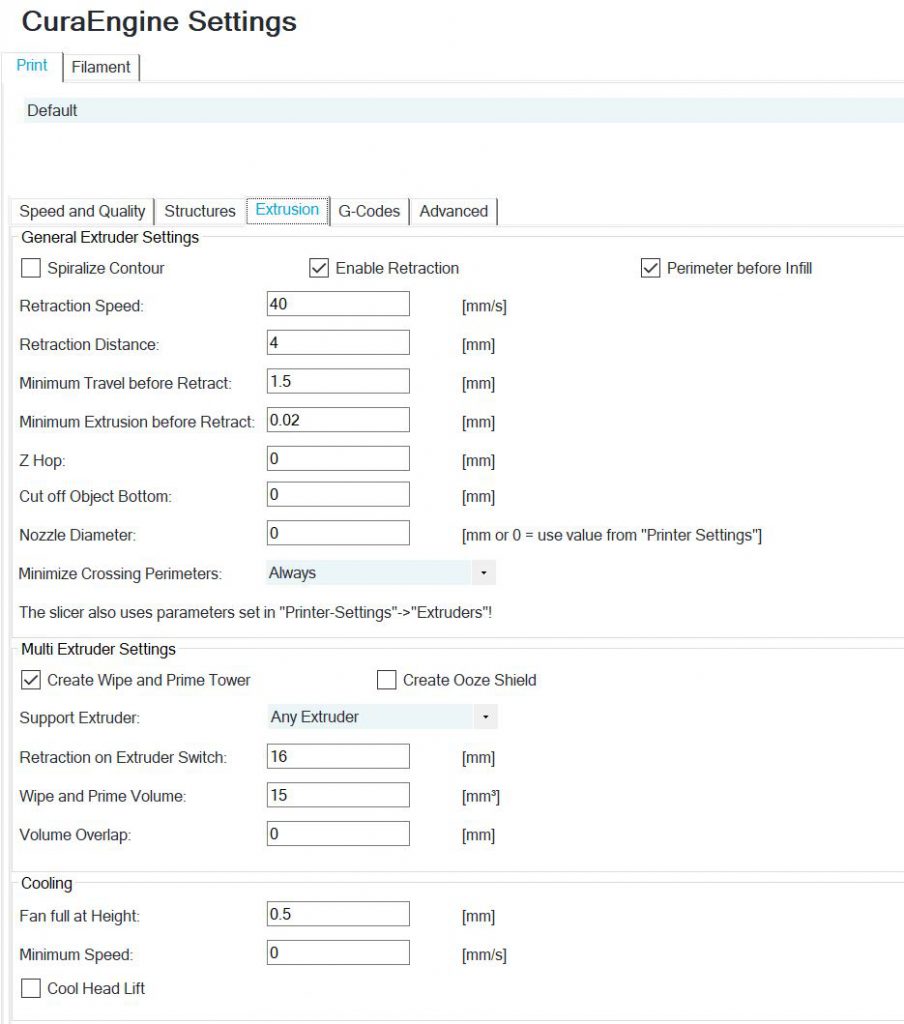
Retraction
Retraction is used when you have stringing, or oozing in your print. Instead of just stopping the extruder when it’s not needed, it actually reverses it to retract the material. This prevents it from dripping out during travel movements. Retraction speed is how fast the reversing is, and distance is how far the filament is pulled back.
Z hop
Z hop lifts the head slightly during travel movements, to prevent possible collisions with the printed product.
Nozzle diameter
The nozzle diameter is the size of the hole that your material is deposited through. This diameter is usually stamped or engraved on the side of the nozzle, and it is important to set this value accordingly.
Cooling
This is the setting for part cooling. Not all printers have a fan for part cooling (most do). This controls when in the print it switches on, and what the minimum head movement speed is.
Filament
This tab is the tab you’ll be playing with the most. Filament producers usually advise a printing temperature range, but this depends on a lot of factors. You’ll be playing with the print and bed temperature quite a bit to get the texture, adhesion and finish right.
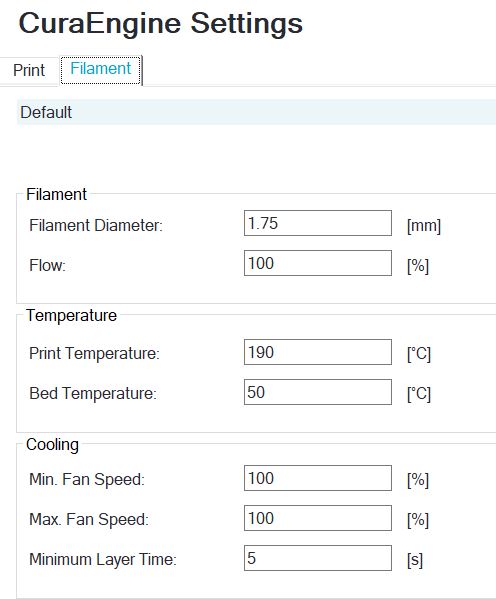
Filament diameter and flow
The filament diameter is the diameter of the filmament (wire) that you buy on a spool. This is the source material of your product, and I recommend using a good quality filament. I’ve personally made the mistake of using cheap filament, and spent a lot of hours trying to troubleshoot it. Never was able to, and good filament solved all the issues I was having. Please do measure the thickness at several spots on the spool with a caliper, and input the actual thickness here. If you do that, 100% flow will likely be correct.
Temperature
This is where the science turns to magic. Getting the right temperature is often a case of emperical science, AKA trial and error. The right print temperature depends on humidity, ambient temperature and filament brand. When starting out, or buying from a new supplier, print a temperature tower to calibrate (make sure the temperature changes with each block). The right bed temperature is usually just above the glass transition temperature of your filament.
Cooling
This controls your part cooling fan. The part cooling fan cools the extruded material to improve the tolerances throughout the print. I print mostly PLA, and for that I want the fan on full whack. When printing other materials, lower settings can be preferable.
There you have it, the basics of slicer settings. Next up I’ll walk you through downloading your first model, converting it and actually starting a print. If you are missing anything, found a mistake or would like to see more in depth info, reach out in the comments.


Hi, I do believe this is an excellent website. I stumbledupon it 😉 I’m going to revisit once again since I saved as a favorite it. Money and freedom is the best way to change, may you be rich and continue to help others.
Wow that was odd. I just wrote an really long comment but after I clicked
submit my comment didn’t appear. Grrrr… well I’m not writing
all that over again. Anyway, just wanted to say wonderful blog!
Thank you! Weird that your comment wasn’t posted. I don’t see anything in the logs.
Have you ever considered about including a little bit more than just your articles?
I mean, what you say is fundamental and everything. But imagine if you added some great photos or video clips to give your posts more, “pop”!
Your content is excellent but with pics and videos, this blog
could certainly be one of the best in its niche.
Terrific blog!
That’s an excellent suggestion. Anything specific you’d like to see?
I have been browsing online more than 4 hours
today, yet I never found any interesting article like yours.
It’s pretty worth enough for me. In my view, if all webmasters and bloggers made
good content as you did, the net will be a lot more useful than ever before.
Well thank you very much
I apologise, but, in my opinion, you are not right. I am assured. I suggest it to discuss.
What do you mean? anything specific you disagree with?
Hi there to every body, it’s my first go to see of this blog; this website contains awesome and actually
fine stuff for visitors.
Thanks in favor of sharing such a nice thinking, piece of writing is good,
thats why i have read it completely
Write more, thats all I have to say. Literally,
it seems as though you relied on the video to make your point.
You definitely know what youre talking about, why throw away your
intelligence on just posting videos to your site when you could be
giving us something enlightening to read?
What do you mean? There is a single gif on the page?
Hello there! This post could not be written any better! Reading this post reminds me of my previous room mate!
He always kept chatting about this. I will forward
this page to him. Fairly certain he will have a good read.
Thank you for sharing!
I’m not that much of a internet reader to be honest but your sites really nice, keep it up!
I’ll go ahead and bookmark your website to come back later.
Cheers
I have read so many articles or reviews concerning the blogger lovers except this paragraph is truly a pleasant
paragraph, keep it up.
I’m impressed, I must say. Rarely doo I come across a
blog that’s equally educative and entertaining, and let me tell you,
you have hit the nail on the head. The problem is something
too few people are speaking intelligently about.
I am vedry happy I found this in my hunt for something relating to this.